We are still actively working on the spam issue.
Home server/Routing for retards
Networking guide and recommendations for homelabs.
Contents
[hide]General scope and purpose of this guide
The point is to get (you) into networking, provide some best practises and software/learning suggestions, and show some ez mode copy and paste commands to set up some enterprise tier routing on commodity hardware.
Where to learn networking
Books
- Data Communications and Networking ISBN: 978-0073376226
Router hardware
DIY
Generally speaking, any CPU made in the last 10 years is capable of forwarding gigabit network traffic so the requirements for DIY routing is pretty damn low. The same is true for memory and disk, just the bare minimum will do.
Some things to consider are if you need multiple NICs (or is it more economical to pick up a managed switch and run a router on a stick configuration), do you want to do HA with multiple boxes, and it's good to stick to brand name peripherals as you're guaranteed compatibility and hardware offload features.
Appliance
There are a lot of options out there, most of them are pretty awful. The best bet for learning is getting your hands on some old Cisco gear, however the ones that seem affordable are usually quite limited both in software options and hardware capability (usually only one or two gigabit ports, abysmal throughput and shit loads of sploits because it's last firmware release was in 2008).
Avoid Juniper for the above reasons and because they now use a subscription model so you might be able to buy a very nearly new box for next to nothing but you won't be able to update it or it just won't have any OS at all unless you can pull $5k out of your ass.
Recommended brands if you really can't be fucked rolling your own:
Prosumer
- Ubiquity
- EnGenius
- MikroTik
Enterprise
- Cisco
- ISR 819 (4G modem, hardened, GPS time sync/tracking for some reason)
- ISR 921 (current gen device, sometimes pop up for peanuts)
- Aruba
- Dell
- HP
Routing software
VyOS
Text mode Linux router with JunOS inspired interface. A long distant fork of Vyatta Core it also has many modern features such as Wireguard VPN, PBR, zone based firewalls, FRR (BGP/OSPFv3/BFD), EVPN+VXLAN and VRRP.
Text mode only, commit and save are explicit with boot/runtime configuration as well as diff-able history and rollback from bootloader.
Pros
- Boots in literal seconds
- Very cool TUI, the entire system is one big conf file
Cons
- Steep learning curve
- If you forget to save, everything you did is lost on reboot (also a pro?)
- WAN load balancer is full of bugs, avoid
Further reading:
opnsense
A fork of pfsense with a modern GUI, it also gets more frequent updates and tends to be more straightforward to use providing you know what to look for.
This is a GUI managed system with implied commit and save work flow.
Pros
- Good for beginners through professional users
- Identical feature set to pfsense
- Easy to use GUI
Cons
- Save on commit with no discard/rollback mechanism
- Many options with no real clues as to which ones are required or optional
- You cannot add new packages if your install is a single minor version out of date, this requires a reboot which will obviously take your network down
Further reading:
pfsense
Great all rounder that's based on FreeBSD, has many modern and advanced features such as Wireguard VPN, PBR and does some fancy L7 DPI/filtering.
This is a GUI managed system with implied commit and save work flow.
Pros
- Good for beginners through professional users
- Lots of features (like all of them)
- Easy to use GUI
Cons
- Bloat
- Save on commit with no discard/rollback mechanism
- Many options with no real clues as to which ones are required or optional
Further reading:
Others
OpenSense[1], open-WRT[2], DD-WRT[3], Tomato[4]
Switch hardware
For a home lab you really only need a L2 managed switch, "L3" features like voice vlans or static routing is going to be pointless or slow as shit on old used hardware, the L2 stuff is always line speed and just about everything made in the last 15 years is going to do the job.
Prosumer
- Ubiquity
- MikroTik
- EnGenius
- Edimax
Enterprise
- Cisco
- Aruba
- Dell
- Powerconnect 5524 (24GbE + 2 SFP+, all over ebay <$100USD, loud)
- HP
Basics: Private subnet to keep mom from finding my furry porn
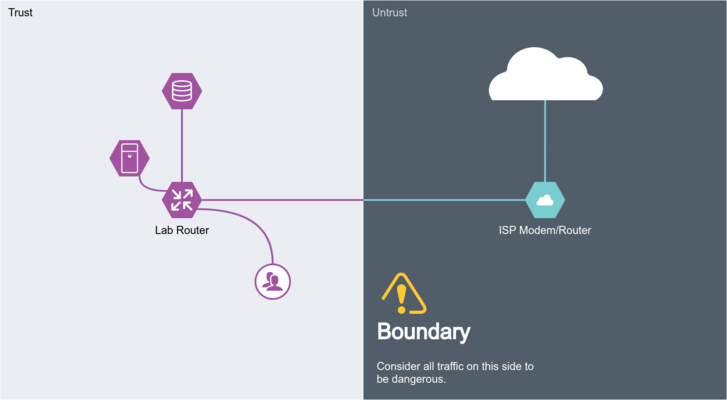
The idea here is we want to run a separate network from the default LAN provided by the ISP router. Housemates use the "LAN" as usual but we put all of the /hsg/ boxes behind another router. This keeps your gear safe from prying eyes and also protects normies if you get your shit hacked.
One thing to consider is how the ISP router will understand how to reply to your subnet. The easiest is to use SNAT on the lab router, all traffic appears to come from the router itself and no additional configuration is needed, however if you wish to expose part of your lab to other users you will need to port forward. A better solution is to see if your ISP router supports RIP or other dynamic routing protocols, baring support for these static routes can be added to hairpin traffic back to your lab router.
Basics: Firewalls
Firewalls are pretty straight forward, all we want to do is keep the weirdo's out while not locking ourself out of the router. As a general rule we split our network into two zones, trust and untrust.
Trust is our LAN, for simplicity sake even if we are running multiple subnets there isn't much point firewalling traffic between them so they all belong here. And we want to be able to send arbitrary traffic to the untrust zone, since there's no way to list ALL of the sites or servers out on the internet that you might care to visit.
Untrust is the internet and any subnets connected to the internet in an unprotected way (i.e. port forwarding). This zone should not be able to pass traffic to our trust zone unless it was originated by the trust zone... originally.
Basics: VLANs
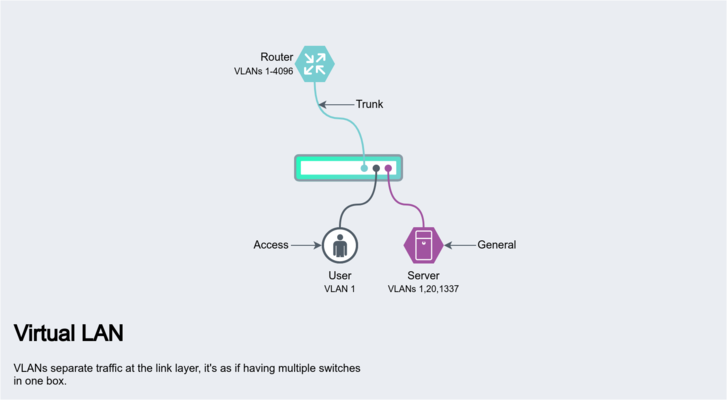
VLANs allow you to separate traffic within a switch and to send multiple networks over a single cable. It's good to know about the different types of VLANs and how a switch is configured to work with them.
Tagged and untagged
- Untagged: This is what you normally see on a network that's either not using VLANs at all or at an "access" port of a VLAN capable switch. These are regular ethernet frames that don't require any additional configuration for client devices to use.
- Tagged: Traffic contains a IEEE 802.1Q frame as part of the packet, it tells whatever device consuming the traffic, that this particular packet belongs to VLAN 10 for example.
Port Types
- Trunk: A trunk port is used for forwarding ALL VLANs to either another switch or router.
- Access: An access port is used to untag a VLAN and provide only that networks traffic to whatever device is connected. A client connected to this port cannot receive or send to any other VLAN.
- General: These ports are similar to trunk ports only you can configure which VLANs are distributed. A use case would be forwarding a general purpose and storage network to a particular desktop client, they then have access to a private NAS and the internet over a single cable without exposing the entire network to that machine.
A typical use case for a homelab is where you want to set up multiple networks, but your router lacks enough ports to accommodate them all. This is usually referred to as a "router on a stick" topology, the router is connected by only one or two physical links to a trunk port. The switch in turn is connected to your modem, servers, clients, etc. Each of these devices are grouped into VLANs, say 100 for the modem, 200 for servers, 1 for clients and so on, (using an access port so they can't communicate with each other unless we explicitly allow it). The router on the other hand has the job of untagging these VLANs from the trunk port and assigning addresses to VIFs. These virtual interfaces are just regular interfaces from the routers perspective, so if we added a route to send all inbound traffic via the modems IP this would work as expected. And as you might have guessed, since everything is now connected to a switch we can do things like hook into various stages of an up link for troubleshooting without using a port mirror, and just generally keep things better organised without having to use a switch per network.
Basics: Port forwarding over CGNAT
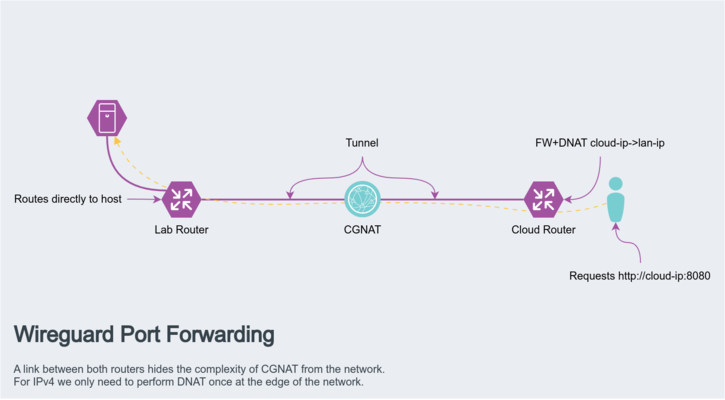
Let's say you have some service or vidya game you wish to share publicly, you have the hardware to do it, the internet connection to handle the bandwidth, but you can't actually accept the incoming traffic as you don't have a public IP or your IP changes so often even DDNS can't keep up.
One way around this is using a VPN, but rather than going site to site (since neither you or your client have a routable public address) we can do site to hub. A cloud server is used as the hub, this has the advantage that it's already on a very fast network with a static IP and no restrictions on what traffic you can receive. It can also be quite cost effective as you can use hourly billed cloud providers if you only need the functionality on rare occasions. For what constitutes a "router" is up to you, but installing actual router platforms like pfsense is recommended since they are designed for the task and often provide much easier ways to configure this shit than "just run a script lmao".
In order for this to work you need both routers to know about both networks, your LAN and the cloud servers.
Local routing table:
S>* 0.0.0.0/0 [0/0] via 192.168.101.1, eth1, weight 1, 23:14:50
S>* 172.105.182.0/24 [200/0] via 10.251.1.1, wg1, weight 1, 00:16:44
C>* 192.168.0.0/24 is directly connected, eth0, 4d18h07m
C>* 192.168.101.0/24 is directly connected, eth1, 4d18h07m
C>* 10.251.1.0/30 is directly connected, wg1, 4d18h07m
Remote routing table:
S>* 0.0.0.0/0 [0/0] via 172.105.182.1, eth0, weight 1, 23:14:50
S>* 192.168.0.0/24 [200/0] via 10.251.1.2, wg1, weight 1, 00:16:44
C>* 172.105.182.0/24 is directly connected, eth0, 4d18h07m
C>* 10.251.1.0/30 is directly connected, wg1, 4d18h07m
In this example the tunnel itself uses are transit network of 10.251.1.0/30, which means you have an IP for the two routers and nothing else, make sure you add them to the allowed-ips parameter in the peer section, as well as the networks you wish to route.
Intermediate: Policy Based Routing
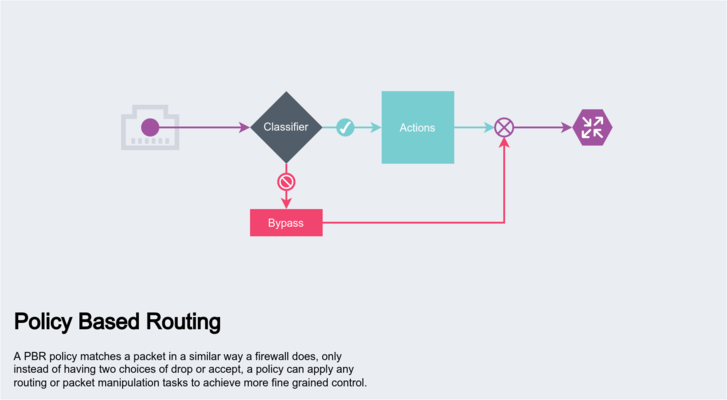
Policy Based Routing (PBR) is useful where you need more fine grained control than static routes. The core tool used on linux platforms is the ip rule cli, this allows classifying connections based on common L3 parameters and assigning that traffic to a particular routing table. If you need more specific selectors and control, iptables can be used to set a fwmark and a post routing rule can manipulate it's DSCP value for example.
Actual use cases for PBR include gateway selection based on traffic source or type. You might for example run a VPN to access most of the internet but want to have your torrent client go directly through the ISP in order to reduce the bandwidth usage on the VPN side. If you got yourself banned on a mongolian basket weaving forum you could also tether your phone to your router and selectively shit post via 5G without affecting the rest of your network. Many such set ups are possible, and more complex arrangements can be designed as these rules are evaluated in order, while a rule can also simply be a jump to another position in the rules list.
Below we have defined two routing tables, 101 and 102 with a different default gateway
$ ip route show table 101
default nhid 22106 via 192.168.101.1 dev eth4 proto static metric 20
$ ip route show table 102
default nhid 22145 via 192.168.102.1 dev eth5 proto static metric 20
Next setup some rules
$ ip rule add iif eth0 dport 80 table 101
$ ip rule add iif eth0 dport 443 table 102
Which should give the following output from ip rule list command
0:	from all lookup local
32761:	from all iif eth0 dport 80 lookup 101
32762:	from all iif eth0 dport 443 lookup 102
And that's it! All traffic coming in eth0 bound for HTTP will be routed via eth4, while HTTPS traffic is routed via eth5, it probably doesn't make any sense to do this but you can probably get an idea of just how powerful PBR is.


